计划视图
计划视图 用于为你的载具规 划自动化任务_ 并上传到载具。 一旦任务已 规划 并被送往载具,您将切换到飞行视图 来执行任务。
界面概述
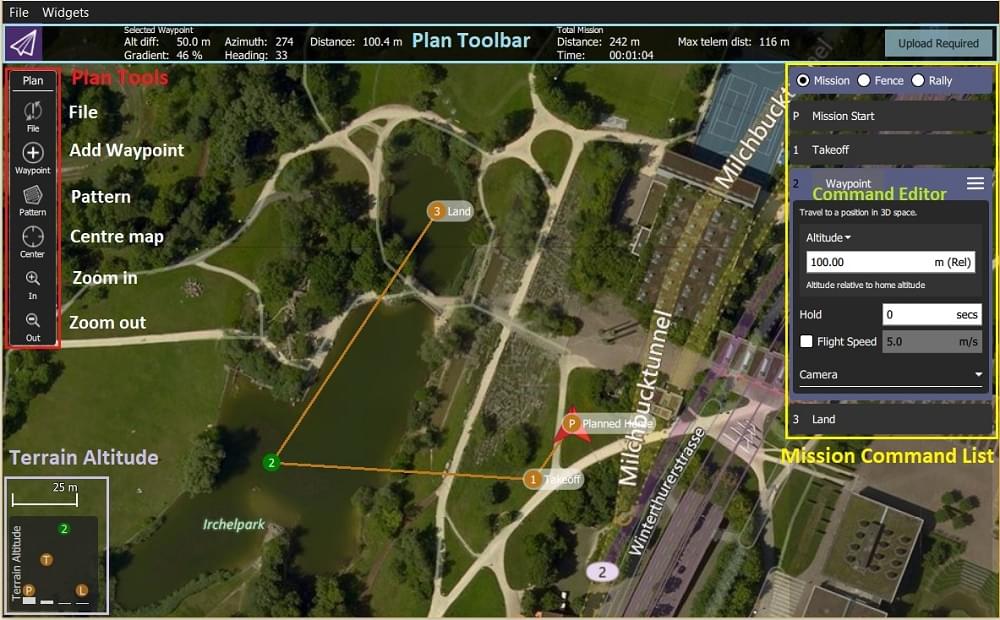
屏幕截图 显示一个简单的任务计划,该任务从计划起始点位置(H)起飞,途经三个航点,然后在最后一个航点(即航点 3)降落。
界面的主要要素是:
- 地图: 显示当前任务的带编号指示器,其中包括 计划起始点。 点击指示器来选择他们(用于编辑)或将他们拖动到周围来重新定位。
- 计划工具栏: 当前选定的航点相对于上一个航点的状态信息,以及整个任务的统计资料(飞行任务的水平距离和时间)。
最大距离是计划起始点与最远路点之间的距离。- 当连接到载具时,它也会显示一个 上传 按钮,可以用来上传计划到载具上。
- 计划工具: 用于创建和管理任务。
- 任务命令列表: 显示当前任务项目列表 (选择项目到 编辑)。
- 地形高度概览: 显示每个任务命令的相对高度.
它显示了您当前选择的航点信息以及整个飞行任务的统计数据。
规划一个任务
概括来说,创建任务的步骤如下:
- 更改 计划视图。
- 添加航点或命令到任务中并根据需要编辑。
- 将任务上传到载具上。
- 更改为 飞行视图 并执行任务。
以下各节解释了视图中的一些细节。
计划起始位置
在 计划视图 中显示的 计划起始点 用于设置计划任务时的大致起点(此时飞行器甚至可能并未与 QGC 连接)。 它被QGC会用来估计飞行任务时间和绘制航线。
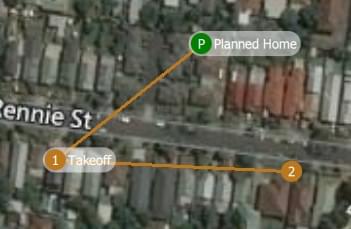
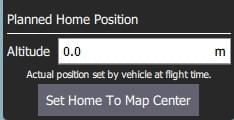
您应该移动/拖动计划中的起始位置到您计划起飞的大致位置。 计划起始位置的高度设置在任务设置 面板中。
TIP
飞行视图显示由载具固件设置的 实际 起始位置。(这是载具在返回/返航 模式返回的地方)。
计划工具
计划工具用于添加单独的航点,方便任务创建复杂的几何,上传/下载/保存/恢复飞行任务,以及导航地图。 主要工具说明如下。
INFO
地图居中, 放大, 缩小工具可以帮助用户更好地查看和浏览 计划视图 地图 (他们不影响送往载具的任务命令)。
添加航点
点击添加航点 工具激活它。 当激活时,点击地图将在点击的位置添加新的飞行任务航点。 该工具将保持激活状态,直到你再次选中它。 一旦您添加了一个航点,您可以选择它并将它拖动到周围以改变它的位置。
文件 (同步)
文件工具 用于在地面站和载具之间传输任务,并保存/还原文件。 工具显示了一个 ! 来表示你没有发送给载具进行任务变更。
INFO
在你执行飞行任务之前,你必须将它上传到载具上。
文件工具 提供以下功能:
- 上传(向载具发送)
- 下载 (从载具加载)
- 保存/保存到文件, 包括 KML 文件。
- 从文件加载
- 移除所有 (从 计划视图 和 从载具中移除所有飞行任务航点)
Pattern
The Pattern tool simplifies the creation of missions for flying complex geometries, including surveys and structure scans.
Mission Command List
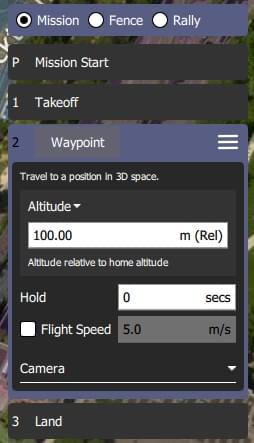
Mission commands for the current mission are listed on the right side of the view. At the top are a set of options to switch between editing the mission, GeoFence and rally points. Within the list you can select individual mission items to edit their values.
Mission Command Editors
Click on a mission command in the list to display its editor (in which you can set/change the command attributes).
You can change the type of the command by clicking on the command name (for example: Waypoint). This will display the Select Mission Command dialog shown below. By default this just displays the "Basic Commands", but you can use the Category drop down menu to display more (e.g. choose All commands to see all the options).
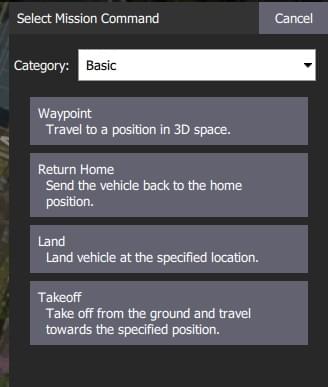
To the right of each command name is a menu that you can click to access to additional options such as Insert and Delete.
INFO
The list of available commands will depend on firmware and vehicle type. Examples may include: Waypoint, Start image capture, Jump to item (to repeat mission) and other commands.
Mission Settings
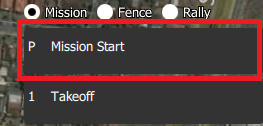
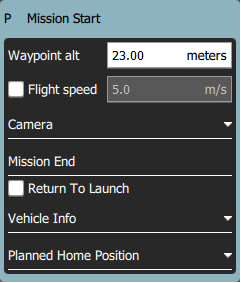
The Mission Start panel is the first item that appears in the mission command list. It may be used to specify a number default settings that may affect the start or end of the mission.
Mission Defaults
Waypoint alt
Set the default altitude for the first mission item added to a plan (subsequent items take an initial altitude from the previous item). This can also be used to change the altitude of all items in a plan to the same value; you will be prompted if you change the value when there are items in a plan.
Flight speed
Set a flight speed for the mission that is different than the default mission speed.
Mission End
Return to Launch after mission end
Check this if you want your vehicle to Return/RTL after the final mission item.
Planned Home Position
The Planned Home Position section allows you to simulate the vehicle's home position while planning a mission. This allows you to view the waypoint trajectory for your vehicle from takeoff to mission completion.

INFO
This is only the planned home position and you should place it where you plan to start the vehicle from. It has no actual impact on flying the mission. 载具的实际Home位置由载具本身在解锁时确定。
This section allows you to set the Altitude and Set Home to Map Centre (you can move it to another position by dragging it on the map).
Camera
The camera section allows you to specify a camera action to take, control the gimbal and set your camera into photo or video mode.
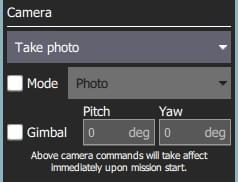
The available camera actions are:
- No change (continue current action)
- Take photos (time)
- Take photos (distance)
- Stop taking photos
- Start recording video
- Stop recording video
Vehicle Info
The appropriate mission commands for the vehicle depend on the firmware and vehicle type.
If you are planning a mission while you are connected to a vehicle the firmware and vehicle type will be determined from the vehicle. This section allows you to specify the vehicle firmware/type when not connected to a vehicle.
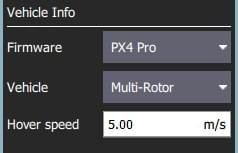
The additional value that can be specified when planning a mission is the vehicle flight speed. By specifying this value, total mission or survey times can be approximated even when not connected to a vehicle.
Troubleshooting
Mission (Plan) Upload/Download Failures
Plan uploading and downloading can fail over a noisy communication link (affecting missions, GeoFence, and rally points). If a failure occurs you should see a status message in the QGC UI similar to:
Mission transfer failed. Retry transfer. Error: Mission write mission count failed, maximum retries exceeded.
The loss rate for your link can be viewed in Settings View > MAVLink. The loss rate should be in the low single digits (i.e. maximum of 2 or 3):
- A loss rate in the high single digits can lead to intermittent failures.
- Higher loss rates often lead to 100% failure.
There is a much smaller possibility that issues are caused by bugs in either flight stack or QGC. To analyse this possibility you can turn on Console Logging for Plan upload/download and review the protocol message traffic.
Further Info
- New Plan View features for QGC release v3.2
- New Plan View features for QGC release v3.3