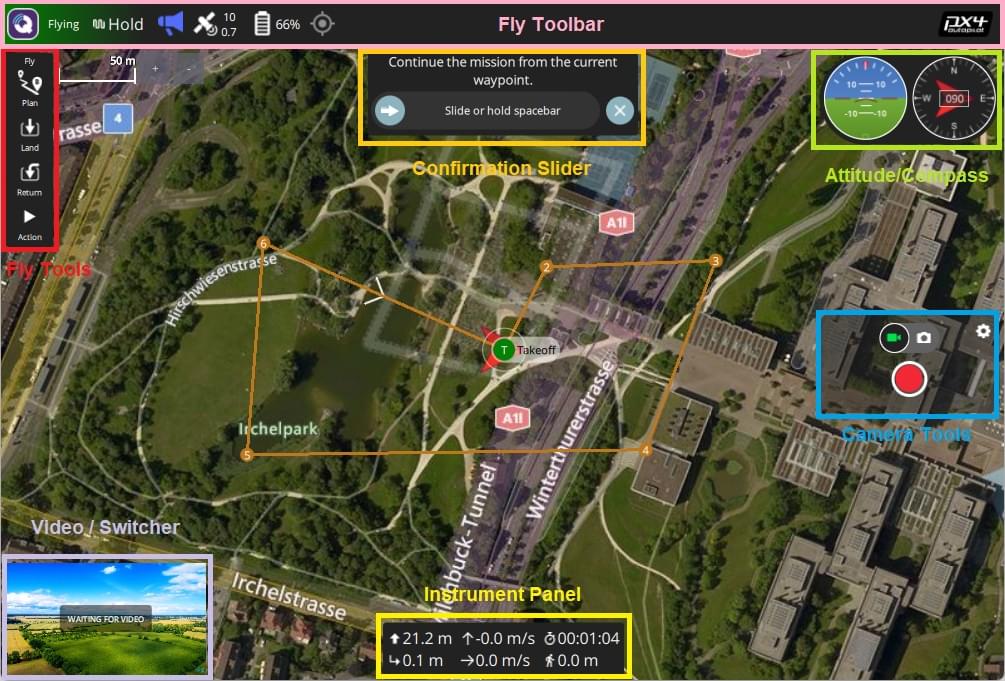
飞行视图
飞行视图用于在飞行时对车辆进行指挥和监视。
您可以使用它:
- 自动运行航前检查表。
- 控制飞行任务:启动, 继续, 暂停, 和恢复。
- 引导飞行器执行解锁/上锁/急停、起飞/着陆、改变高度、去或环绕指定位置,以及返航/RTL。
- 在地图视图和视频视图之间切换(如果可用)
- 显示当前飞行器采集到的视频、飞行任务、数传和其他信息,同时在已连接的多个飞行器之间切换。
界面概述
以上屏幕截图显示了飞行视图的主要元素:
- 地图: 显示所有已连接飞行器的位置及当前飞行器的任务。
- Fly Toolbar: Key status information for sensors (GPS, battery, RC control), and vehicle state (Flight mode, Armed/Disarmed status).
- Select the sensor indicators to view more detail.
- Press the Flight mode text (e.g. "Hold") to select a new mode. Not every mode may be available.
- Press the Armed/Disarmed text to toggle the armed state. While flying you can press this text for Emergency Stop.
- Fly tools: You can use these to:
- Toggle between takeoff/land.
- Pause/restart the current operation (e.g. landing, or the mission).
- Safety return (also known as RTL or Return).
- The Action button offers other appropriate options for the current state (these overlay the Confirmation Slider). Actions include changing the altitude or continuing a mission.
- Enable the preflight checklist (tool option disabled by default).
- Instrument Panel: A multi-page widget that displays vehicle information including: telemetry, camera, video, system health, and vibration.
- Video/Switcher: Toggle between video or map in a window.
- Press the element to switch Video and Map to foreground.
- QGroundControl supports RTP and RTSP video streaming over your vehicles UDP connection. It also supports directly connected UVC devices. QGC video support is further discussed in the Video README.
- A Telemetry Overlay is automatically generated as a subtitle file
- Confirmation Slider: Context sensitive slider to confirm requested actions. Slide to start operation. Press X to cancel.
There are a number of other elements that are not displayed by default/are only displayed in certain conditions. For example, the multi-vehicle selector is only displayed if you have multiple vehicles, and the preflight checklist tool button is only displayed if the appropriate setting is enabled.
Instrument Panel
The instrument panel is a multi-page widget that displays information about the current vehicle, including: telemetry, camera, video, system health, and vibration information.
The default page displays vehicle telemetry - use the drop down menu on the top right to select the other options.
Values (Telemetry)
The values page shows telemetry information; by default the altitude (relative to the home location) and the ground speed.
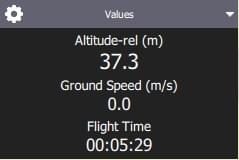
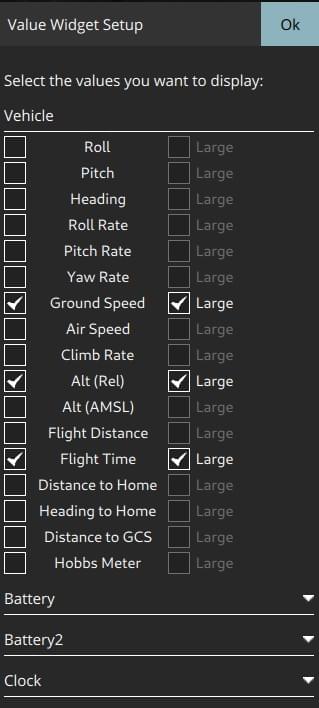
You can configure what information is display by pressing the small gear icon on the top left of the panel. Each value can be displayed in normal or "large" size (large size shows just one value per row in the page, while normal shows 2).
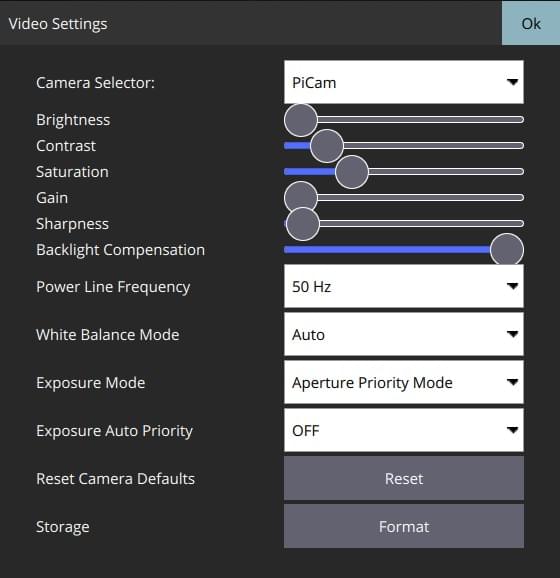
Camera
The camera page is used to configure and control the camera. For a camera connected directly to the Flight Controller the only available option is camera triggering:

When connected to camera that supports the MAVLink Camera Protocol you can additionally configure and use other camera services that it makes available. For example, if your camera supports video mode you will be able to switch between still image capture and video mode, and start/stop recording.
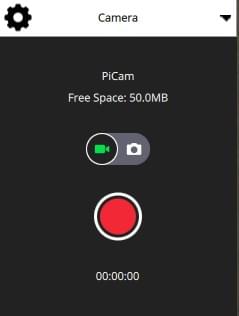
Advanced settings can be changed via the gear icon at the top left of the page.
INFO
Most of the settings that are displayed depend on the camera (they are defined in its MAVLink Camera Definition File). A few common settings at the end are hard-coded: Photo Mode (Single/Time Lapse), Photo Interval (if Time Lapse), Reset Camera Defaults (sends a reset command to the camera), Format (storage)
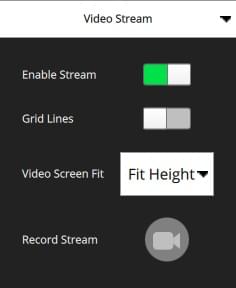
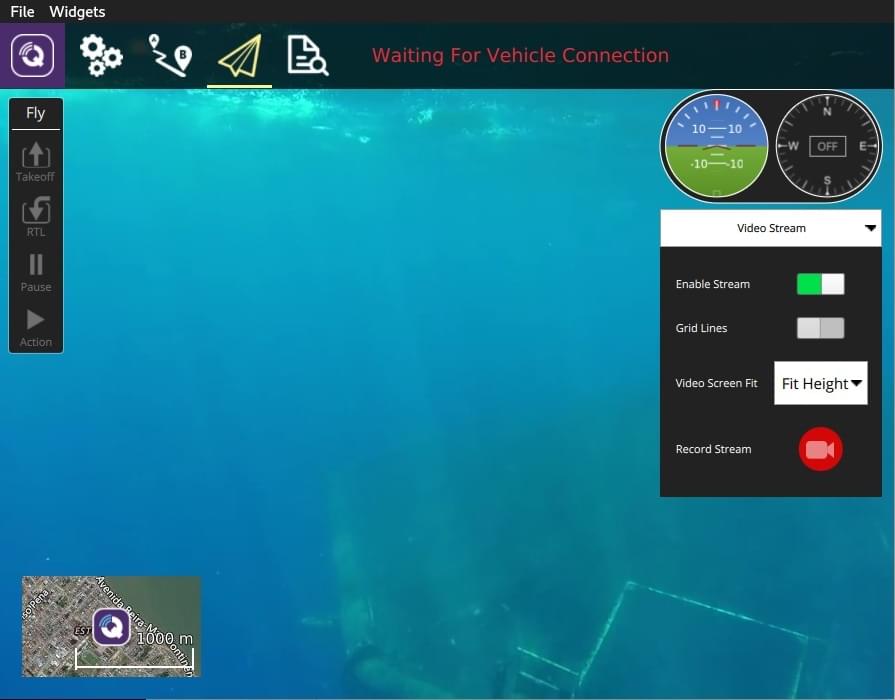
Video Stream
The video page is used to enable/disable video streaming. When enabled, you can start/stop the video stream, enable a grid overlay, change how the image fits the screen, and record the video locally with QGC.
Health
The health page shows you the health of the systems within your vehicle. QGroundControl will switch to this page automatically if any system changes to unhealthy.


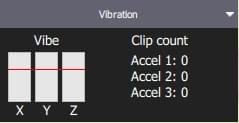
Vibration
The vibration page shows current vibration levels and clip counts.
Actions/Tasks
The following sections describe how to perform common operations/tasks in the Fly View.
INFO
Many of the available options depend on both the vehicle type and its current state.
Pre Flight Checklist
An automated preflight checklist can be used to run through standard checks that the vehicle is configured correctly and it is safe to fly.
To view the checklist, first enable the tool by navigating to Application Settings > General > Fly View and selecting the Use preflight checklist checkbox. The tool will then be added to the Flight Tools. Press it to open the checklist:
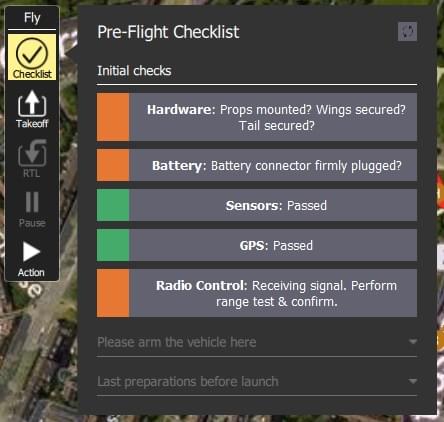
Once you have performed each test, select it on the UI to mark it as complete.
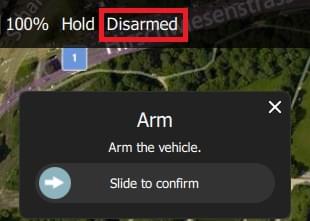
Arm
TIP
Generally QGroundControl does not require you to arm the vehicle explicitly; this is done for you if you start a mission or takeoff.
Arming a vehicle starts the motors in preparation for takeoff.
To arm the vehicle, select Disarmed in the Fly Toolbar and then use the confirmation sider.
INFO
Vehicles usually disarm automatically if you do not take off after a few seconds.
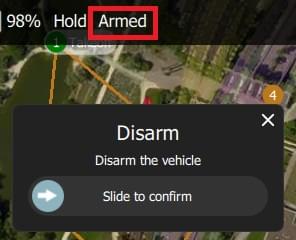
Disarm
Disarming the vehicle stops the motors (making the vehicle safe). To disarm the vehicle select Armed in the Fly Toolbar when the vehicle is landed.
INFO
Disarming the vehicle while it is flying is called an Emergency Stop
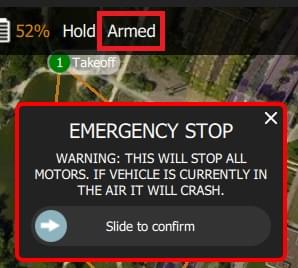
Emergency Stop
Emergency stop is effectively the same as disarming the vehicle while it is flying. Your vehicle will crash!
To disarm the vehicle select Armed in the Fly Toolbar when the vehicle is flying.
Takeoff
TIP
If you are starting a mission for a multicopter, QGroundControl will automatically perform the takeoff step.
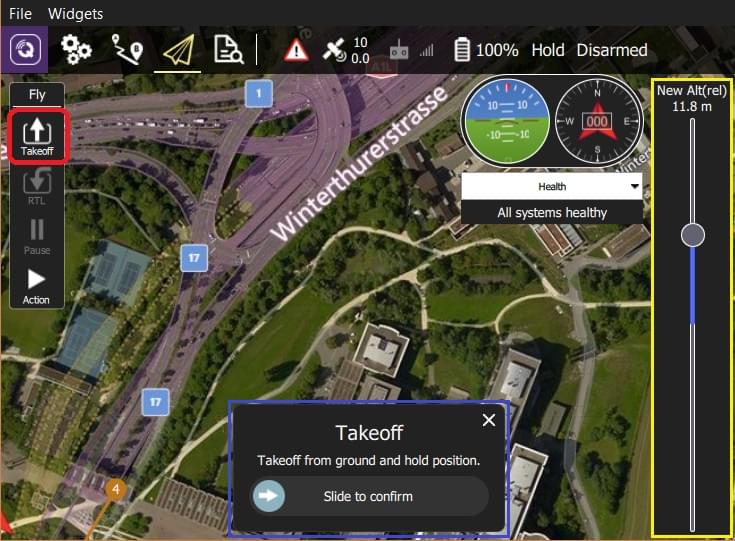
To takeoff (when landed):
- Press the Takeoff button in the Fly Tools (this will toggle to a Land button after taking off).
- Optionally set the takeoff altitude in the right-side vertical slider.
- Confirm takeoff using the slider.
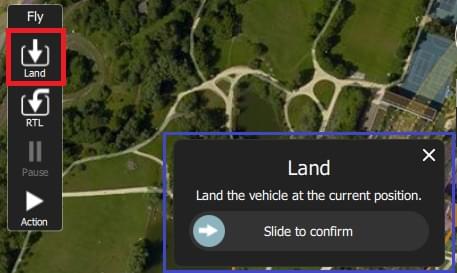
Land
You can land at the current position at any time while flying:
- Press the Land button in the Fly Tools (this will toggle to a Takeoff button when landed).
- Confirm landing using the slider.
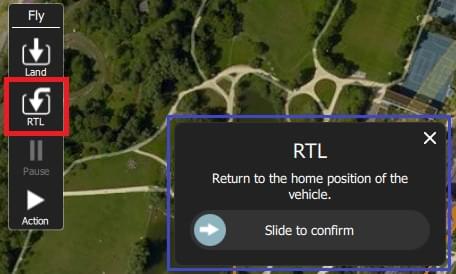
RTL/Return
Return to a "safe point" at any time while flying:
- Press the RTL button in the Fly Tools.
- Confirm RTL using the slider.
INFO
Vehicles commonly return to the "home" (takeoff) location and land. This behaviour depends on the vehicle type and configuration. For example, rally points or mission landings may be used as alternative return targets.
Change Altitude
You can change altitude while flying, except when in a mission:
- Press the Action button on the Fly Tools
- Select the Change Altitude action from the dialog.
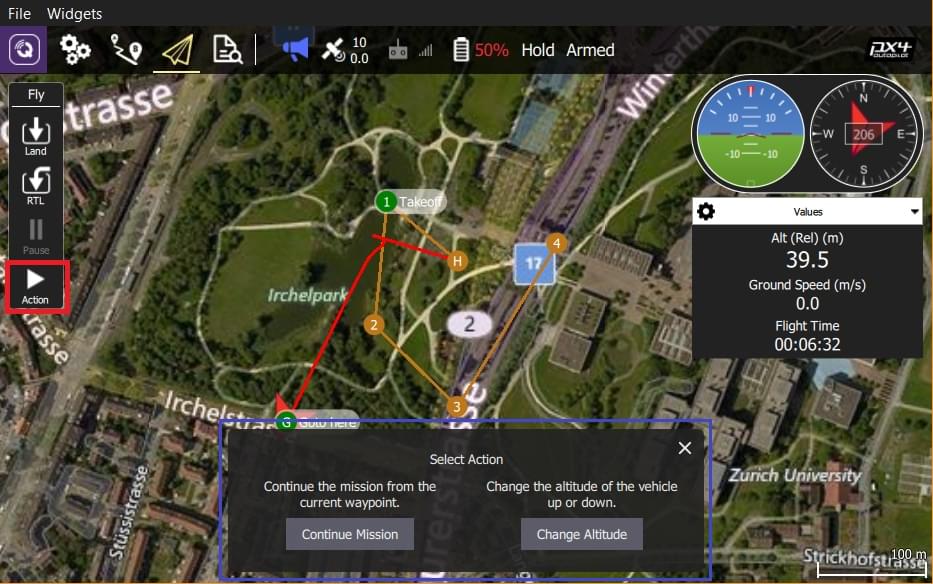
- Move the vertical slider to the desired altitude, then drag the confirmation slider to start the action.

Goto Location
After taking off you can specify that you want to fly to a particular location.
- Left click/Press on the map where you want the vehicle to move and select Go to location on the popup.

- The location will be displayed on the map, along with a confirmation slider.
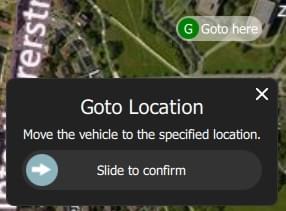
- When you're ready, drag the slider to start the operation (or press the X icon to cancel it).
INFO
Goto points must be set within 1 km of the vehicle (hard-coded in QGC).
Orbit Location
After taking off you can specify that you want to orbit a particular location.
- Left click/Press on the map (near the centre of your desired orbit) and select Orbit at location on the popup.
- The proposed orbit will be displayed on the map, along with a confirmation sider.
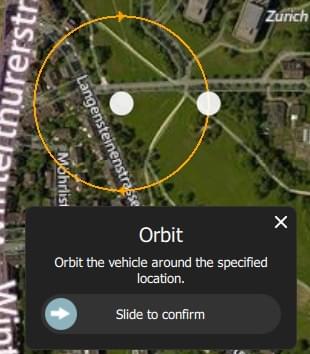
- Select and drag the central marker to move the orbit location.
- Select and drag the dot on the outer circle to change the orbit radius
- When you're ready, drag the slider to start the operation (or press the X icon to cancel it).
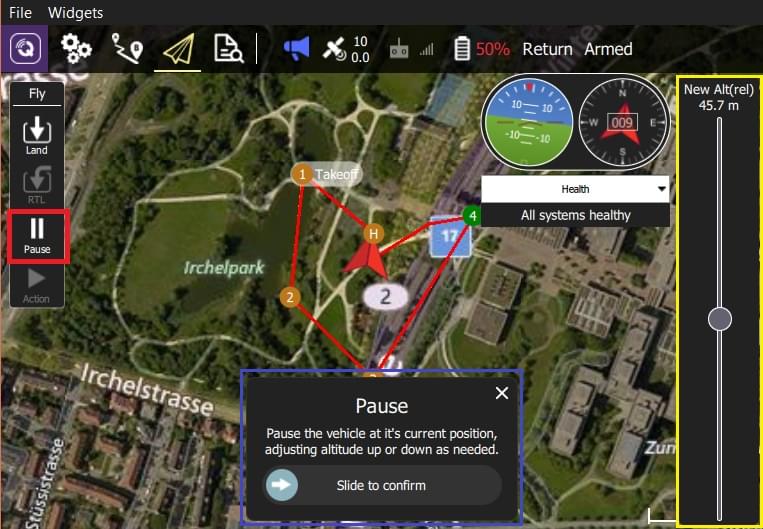
Pause
You can pause most operations, including taking off, landing, RTL, mission execution, orbit at location. The vehicle behaviour when paused depends on the vehicle type; typically a multicopter will hover, and a fixed wing vehicle will circle.
INFO
You cannot pause a Goto location operation.
To pause:
- Press the Pause button in the Fly Tools.
- Optionally set a new altitude using the right-side vertical slider.
- Confirm the pause using the slider.
Missions
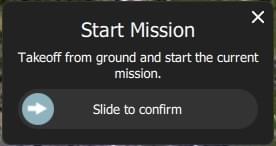
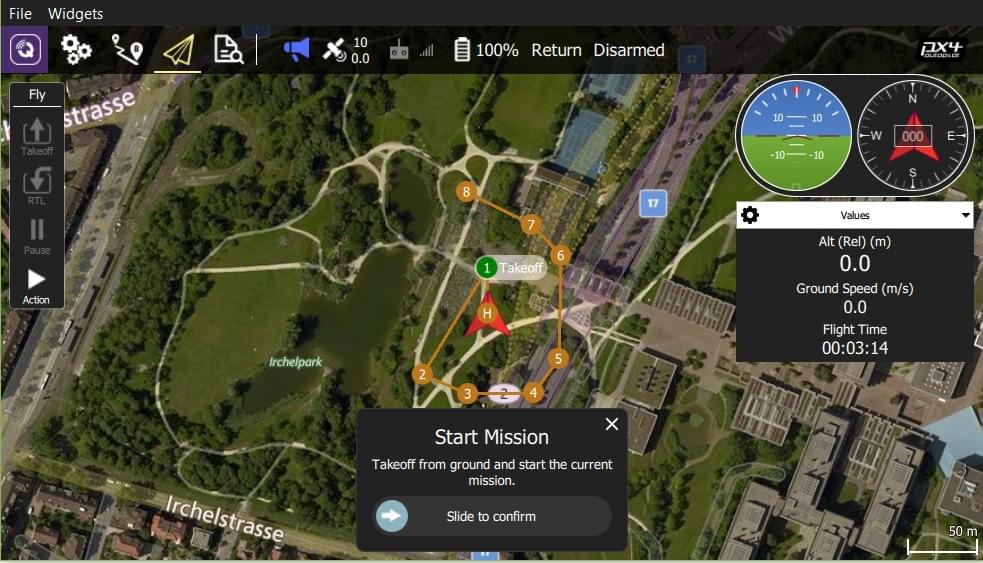
Start Mission
You can start a mission when the vehicle is landed (the start mission confirmation slider is often displayed by default).
To start a mission from landed:
- Press the Action button on the Fly Tools
- Select the Start Mission action from the dialog.
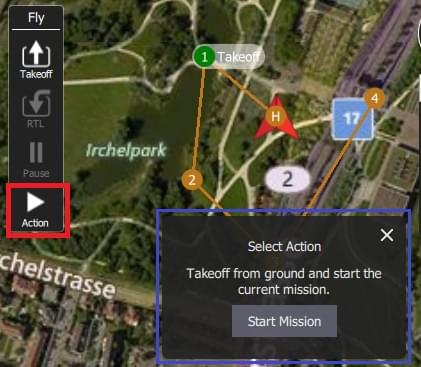
(to display the confirmation slider)
- When the confirmation slider appears, drag it to start the mission.
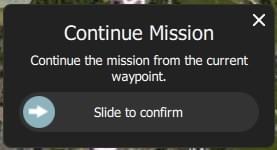
Continue Mission
You can continue mission from the next waypoint when you're flying (the Continue Mission confirmation slider is often displayed by default after you takeoff).
INFO
Continue and Resume mission are different! Continue is used to restart a mission that has been paused, or where you have taken off, so you've already missed a takeoff mission command. Resume mission is used when you've used a RTL or landed midway through a mission (e.g. for a battery change) and then wish to continue the next mission item (i.e. it takes you to where you were up to in the mission, rather than continuing from your place in the mission).
You can continue the current mission while (unless already in a mission!):
- Press the Action button on the Fly Tools
- Select the Continue Mission action from the dialog.
- Drag the confirmation slider to continue the mission.
Resume Mission
Resume Mission is used to resume a mission after performing an RTL/Return or Land from within a mission (in order, for example, to perform a battery change).
INFO
If you are performing a battery change, do not disconnect QGC from the vehicle after disconnecting the battery. After you insert the new battery QGroundControl will detect the vehicle again and automatically restore the connection.
After landing you will be prompted with a Flight Plan complete dialog, which gives you the option to remove the plan from the vehicle, leave it on the vehicle, or to resume the mission from the last waypoint that was traveled through.
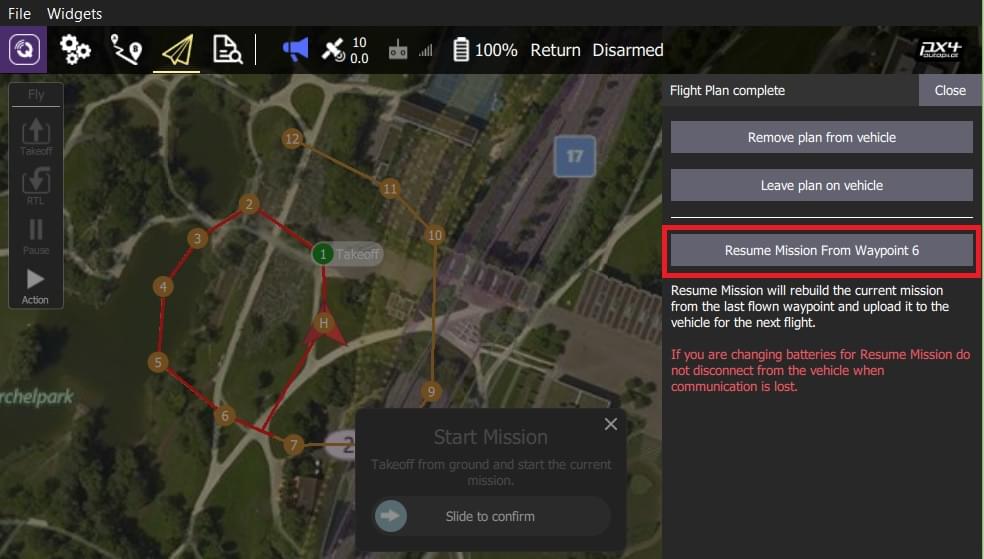
If you select to resume the mission, then QGroundControl will rebuild the mission and upload it to the vehicle. Then use the Start Mission slider to continue the mission.
The image below shows the mission that was rebuilt after the Return shown above.
INFO
A mission cannot simply resume from the last mission item that the vehicle executed, because there may be multiple items at the last waypoint that affect the next stage of the mission (e.g. speed commands or camera control commands). Instead QGroundControl rebuilds the mission, starting from the last mission item flown, and automatically prepending any relevant commands to the front of the mission.
Remove Mission Prompt After Landing
You will be prompted to remove the mission from the vehicle after the mission completes and the vehicle lands and disarms. This is meant to prevent issues where stale missions are unknowingly left on a vehicle, potentially resulting in unexpected behavior.
Display Video
When video streaming is enabled, QGroundControl will display the video stream for the currently selected vehicle in the "video switcher window" at the bottom left of the map. You can press the switcher anywhere to toggle Video and Map to foreground (in the image below, the video is shown in the foreground).
INFO
Video streaming is configured/enabled in Application Settings > General tab > Video.
You can further configure video display using controls on the switcher:

- Resize the switcher by dragging the icon in the top right corner.
- Hide the switcher by pressing the toggle icon in the lower left.
- Detach the video switcher window by pressing on the icon in its top left corner (once detached, you can move and resize the window just like any other in your OS). If you close the detached window the switcher will re-lock to the QGC Fly view.
Record Video
If supported by the camera and vehicle, QGroundControl can start and stop video recording on the camera itself. QGroundControl can also record the video stream and save it locally.
TIP
Video stored on the camera may be of much higher quality, but it is likely that your ground station will have a much larger recording capacity.
Record Video Stream (on GCS)
Video stream recording is controlled on the video stream instrument page. Press the red circle to start recording a new video (a new video file is created each time the circle is pressed); the circle will change into a red square while recording is in progress.
Video stream recording is configured in the Application Settings > General tab:
Video Recording - specifies the recording file format and storage limits.
INFO
Videos are saved in Matroska format (.mkv) by default. This format is relatively robust against corruption in case of errors.
Miscellaneous - Streamed video is saved under the Application Load/Save Path.
TIP
The stored video includes just the video stream itself. To record video with QGroundControl application elements displayed, you should use separate screen recording software.
Record Video on Camera
Start/stop video recording on the camera itself using the camera instrument page. First toggle to video mode, then select the red button to start recording.